Since the middle ages, Venetian plasters and Marmorino have been used to create stunning plaster finishes. Today they are recalled with different names such as ‘polished plasters’ or ‘marble plasters’. These names have been given because of the distinctive finishes achieved. Finishing can be shiny, smooth, and marble-like or textured to look like stones.
Venetian polished plaster never fails to turn heads. It delivers an elegant mirror finish that is one of those finishes that makes a standing statement. There are incredible options to choose from in terms of colours, and patterns including decorative logos and stencils.
Apart from all this, polished plaster is a robust material or ‘lifetime finish’ that is rarely disposed to cracks or shrinkage, unlike other interior applications. Two wafer-thin layers of marble Venetian plaster produce polished, deep transparency.
Very thin coats of Venetian plasters are applied with special trowels or spatulas. The thickness of coats usually varies between 0.5 and 1 mm. Based on the desired effect, the number of coats is decided. The no. of layering of colours is possible with this type of polished plaster. It is the best choice for damp rooms because of its natural fungicidal effect.
For porous surfaces, polished plasters work best. It provides some suction to aid adhesion. A natural Casein Primer is supplied to apply first if the suction is excessive. For applying on impervious materials, special primers such as Baumit DG27 are used that primes and gives a sandpaper-like finish for extra performance.
One of the great features of natural plasters is that they are breathable. A wide range of natural soaps and waxes are applied while finishing giving a highly polished finish surface and improve dirt and water repellency. For special effects, unique metallic and pearlescent pigments are used.

Tools required to apply polished Venetian plaster
The first thing that is important while applying polishes plaster is the right tools. Without having the right tools, you won’t achieve that excellent lustre beautifully reflecting the light. So, choose the right tools, and you’ll be able to do it.
Here’s a list of tools that you’ll need:
- Steel trowel or drywall knife
- Dust mask
- Lint-free cleaning cloths
- Dust sheets
- Hawk
- Mutton cloth
- Protective coating, e.g. Cera Wax
- 400 and 600 grit sandpaper or steel wool
How to prepare ahead of applying polished plaster?
The surface that is going to get plastered should be clean and free from imperfections. To make sure that your surface is smooth, look for any types of holes or cracks and fill them. Sand any rough textures to a smooth finish. For the best possible adherence of the plaster, please clean away any dirt or grease from the surface and make it smooth.
Painted walls are easy to get plastered, but if there is glass paint, then to get rid of the sheen, give it sand.
Last but not least, make sure to round off the corners of the walls with sandpaper so that the plaster is not cut with your trowel as it can cause unsightly flaws.

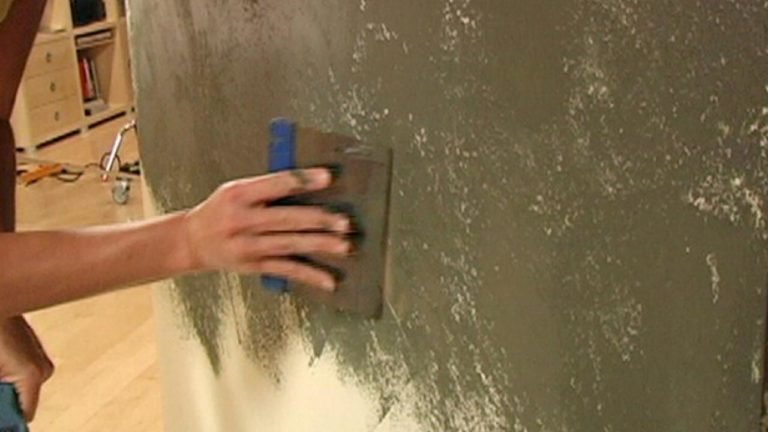
How to apply polished Venetian plaster to walls and ceilings
The process involves three coat by coat applications, and each coat applying process is explained in detail below.
1. First coat
It is essential to apply the first coat carefully if you want your subsequent two coats to be smooth. Here are the steps:
- Start applying at the corner of the room, working your way inwards
- Use hawk and trowel to apply a thin coat of plaster
- Make sure to make the coat thin and even without worrying about its thickness.
- Achieve a smooth surface
- When you’re done, please leave it to dry for at least 16 hours
2. Second coat
Use 400 grit sandpaper and sand the wall or ceiling before you apply a second coat. Use 600 grit sandpaper afterwards and sand the wall again. You can also use steel wool. Do your work with little pressure, in smaller areas with circular motion.
- The second coat goal is to fill the first coat.
- The smoother your first coat is, the easier it is to apply the second one.
- While applying the second coat, begin from the corner, work your way inwards
- Keep it thin and even by using strokes for consistent coverage.
- Give the second coat a minimum of 24 hours to dry.
3. Third coat
For the ultimate flawless finish, a high-end third coat of polished Venetian plaster is applied.
- Applying the third coat is the same as the second one but does not sand the wall or ceiling this time.
- Let the coat dry until it goes matte.
4. Polishing
- Take a trowel, press it lightly, hold it flat against the wall, and move it in small circles. Please leave it to dry to a matte finish again.
- Use a lint-free cloth to wipe away any dust.
- Sand the surface again.
- To remove the final dust, wipe it down with your lint-free cloth.
5. Finishing
Use Cera wax to shine your polished marble Venetian plaster in the end. Apply it using the mutton cloth until you see that stunning mirror finish.